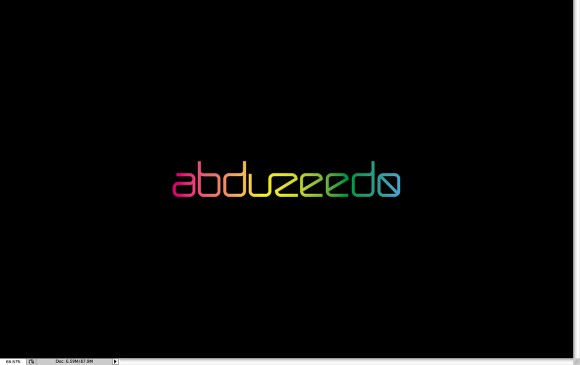
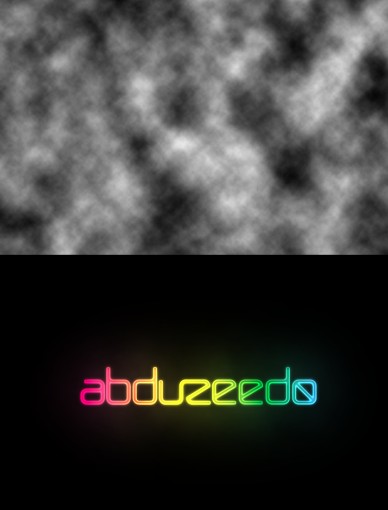
Saturday, November 10, 2012

Neon With Layer Styles Photoshop Text Effect


Step 1

Open Photoshop and create a new document. I'm using 1920x1200 pixels. Fill the background with black.
Photoshop Quick Tips: Neon with Layer Styles

Step 2

Import your logo and duplicate it. We will use 2 layers to achieve the effect, one will be the glow and the other the neon light.
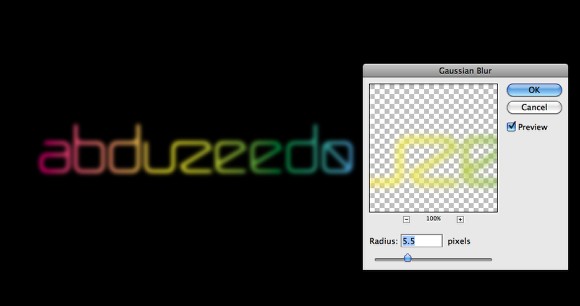
Photoshop Quick Tips: Neon with Layer Styles

Step 3

Select one logo and go to Filter>Blur>Gaussian Blur. Use 5.5 pixels for the Radius.
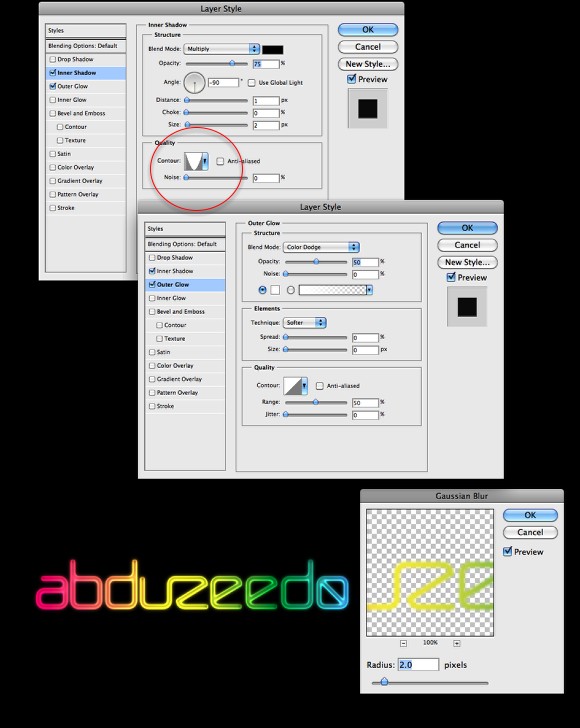
Photoshop Quick Tips: Neon with Layer Styles

Step 4

With the other logo layer, go to Layer>Group Layers. Now you will have the layer inside a folder. Change that folder's Blend Mode to Color Dodge. Inside the folder select the logo layer and go to Layer>Layer Style>Inner Shadow. Use black for the color and Multiply for the Blend Mode. Change the Opacity to 75%, the Angle to -90º, Diastase to 1 pixel and Size to 2 pixels. Now a very important part, change the Contour to the Cone-Inverted preset.
After that select Outer Glow. Then use Color Dodge for the Blend Mode, 50% for the Opacity, 0% for the Noise, white for the color.
The last thing on this stepe is to add some blur. Go to Filter>Blur>Gaussian Blur. use 2.0 pixels for the Radius.
Photoshop Quick Tips: Neon with Layer Styles

Step 5

Select all layers used to create the logo and duplicate them (Layer>Duplicate). Then merge the duplicated layers (Layer>Merge Layers). Now just go to Filter>Blur>Gaussian blur. Use 100 pixels for the Radius.
This layer will be beneath the logos.
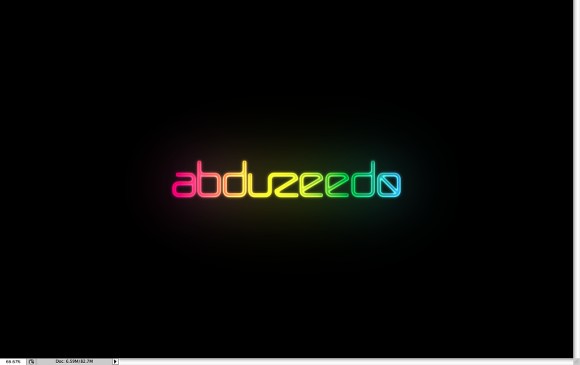
Photoshop Quick Tips: Neon with Layer Styles

Step 6

Add a new layer on top of the others and go to Filter>Render>Clouds. I love render clouds, it gives a nice touch to the design, more natural and less uniform. Also make sure that you were using black and white for the colors. After that change the Blend Mode to Soft Light and the Opacity to 30%.
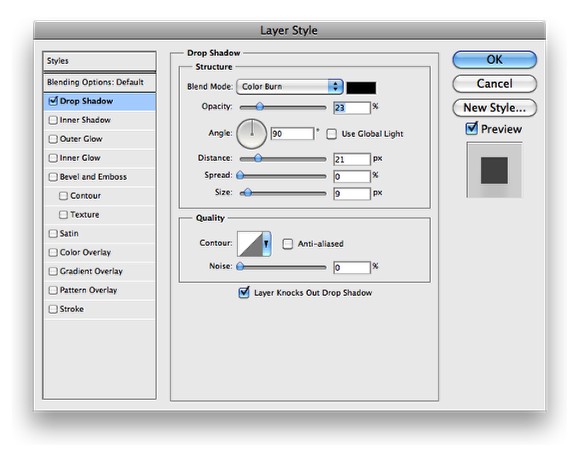
Photoshop Quick Tips: Neon with Layer Styles

Step 7

Select the blurry layer created in the Step 3 and then go to Layer>Layer Style>Drop Shadow. Change the Blend Mode to Color Burn, use black for the color, 25% Opacity, 90º for the Angle, 20 pixels for the Distance and 10 pixels for the size. This layer style will create a shadow and add more depth to the composition.
Photoshop Quick Tips: Neon with Layer Styles

Conclusion

Now you will be able to create really cool texts with light effects easily. Also I suggest that you play with the Contour options like I did in the Step 4. You can achieve totally different results by just changing the contour, it's a very powerful feature and a bit unknown for the majority. This was just an example, now it's up to you.

Monday, November 5, 2012

Create a Dissolved Ancient Ink Text Effect

Create a Dissolved Ancient Ink Text Effect


In this tutorial, I will show you the steps I took to Create a Dissolved Ancient Ink Text Effect in Photoshop... Let's get started  guys !! 
To complete this tutorial, you will need the following stocks:

Step 1

Create a new document sized 1280px * 700px with black background. Load the paper texture into Photoshop and select the whole image, copy and paste it onto our document. Rotate this new layer 90 degree and resize it to fit our canvas:
1 resize 500x291 Create a Dissolved Ancient Ink Text Effect in Photoshop
Load the Ink brushset into Photoshop, select the eraser tool and use the following three brushes to apply some rough edge effect to this paper texture:
1 eraser 500x189 Create a Dissolved Ancient Ink Text Effect in Photoshop
1 erase 500x272 Create a Dissolved Ancient Ink Text Effect in Photoshop
Add the following 2 adjustment layers as clipping mask to the paper texture:
Black and White
1 bw Create a Dissolved Ancient Ink Text Effect in Photoshop
Layer mask on the black and white adjustment layer:
1 bw mask 500x274 Create a Dissolved Ancient Ink Text Effect in Photoshop
Levels
1 lvs Create a Dissolved Ancient Ink Text Effect in Photoshop
and here is the effect so far:
1 effect 500x269 Create a Dissolved Ancient Ink Text Effect in Photoshop

Step 2

Create a new layer and use a white soft brush to paint some light over the texture layer:
2 paint light 500x189 Create a Dissolved Ancient Ink Text Effect in Photoshop
Use the font we downloaded to type some texts onto the canvas:
2 text 500x198 Create a Dissolved Ancient Ink Text Effect in Photoshop
Rasterize the type as shown below by right-click the text layer and choose “Rasterize Type”:
2 rast Create a Dissolved Ancient Ink Text Effect in Photoshop
Grab the eraser tool and choose the chalk brush:
2 chalk brush 500x349 Create a Dissolved Ancient Ink Text Effect in Photoshop
Apply this chalk brush gently around the edge of the text to add some disolved effect:
2 erase 1 500x320 Create a Dissolved Ancient Ink Text Effect in Photoshop
2 erase 500x271 Create a Dissolved Ancient Ink Text Effect in Photoshop

Step 3

Apply the following blending options to this text layer:
Bevel and Emboss
3 bevel 500x359 Create a Dissolved Ancient Ink Text Effect in Photoshop
Inner Glow
3 inner glow 500x359 Create a Dissolved Ancient Ink Text Effect in Photoshop
Pattern Overlay
3 patt over 500x359 Create a Dissolved Ancient Ink Text Effect in Photoshop
and here is the effect so far:
3 effect 500x230 Create a Dissolved Ancient Ink Text Effect in Photoshop

Step 4

Let’s add some abstract dots and lines around the cavnas for some extra effect. Create a new layer and use a 100% hardness, white brush to paint a dot as shown below:
4 paint Create a Dissolved Ancient Ink Text Effect in Photoshop
Then use a slightly smaller eraser with 100% hardness to remove the centre portion to form a circle:
4 erase 500x365 Create a Dissolved Ancient Ink Text Effect in Photoshop
Use the line tool to draw a line with the following tool settings:
4 line tool setting 500x36 Create a Dissolved Ancient Ink Text Effect in Photoshop
4 line tool 500x410 Create a Dissolved Ancient Ink Text Effect in Photoshop
Duplicate this dot and line layer and link them together as shown below:
4 join Create a Dissolved Ancient Ink Text Effect in Photoshop
Merge these lines and dots layers and duplicate the merged layer a few times, scatter them around the canvas as shown below:
4 dup 500x274 Create a Dissolved Ancient Ink Text Effect in Photoshop

Step 5

We’re almost done! For some final touches, I flatten the image and duplicate the background layer, use the Lasso Tool with a 30px to draw a selection around the text:
5 lasso 500x211 Create a Dissolved Ancient Ink Text Effect in Photoshop
Apply the following Surface Blur filter to this selection:
5 surface blur Create a Dissolved Ancient Ink Text Effect in Photoshop
For adjusting the colour effect, we can add the following Selective Color adjustment layers:
5 sel Create a Dissolved Ancient Ink Text Effect in Photoshop
5 sel neu Create a Dissolved Ancient Ink Text Effect in Photoshop
We can render or paint some cloud effect around the text as well for some extra dramatic effect:
5 cloud 500x188 Create a Dissolved Ancient Ink Text Effect in Photoshop
Add the following Levels adjustment layer on top:
5 lvs Create a Dissolved Ancient Ink Text Effect in Photoshop
and here is my final effect for this tutorial: (click to enlarge)
ink text flatten 500x273 Create a Dissolved Ancient Ink Text Effect in Photoshop
That’s it for this tutorial! Hope you enjoy it and find it useful! Till next time, have a great day! [ PSDPLUS ]